
Scott Horton
Clotheslines to Garden
Journal Entry, January 23, 2023
The Wisconsin Hortons have a view from their “Command Center” (a living area on the upper floor of their home in Omro, Wisconsin where my sweetheart Debbie envisioned the family being able to work on computers, teach homeschool, and just chill with our cats). This view allows those who pause to look, the ability to enjoy the “greenery” of the backyard—at least during the summer. As one scans through the bay window, two wooden structures over thirty feet apart might catch your eye; they each consist of two posts and a lintel of pressure-treated 4x4s. When we moved into our home in May of 2018, these structures supported wooden-bench swings that had aged quite a bit; but the structures were also connected by very thick-gauge wires: a place to hang laundry.
As I thought about these structures, my mind considered 1) removing them, or 2) replacing the swings with prettier (and safer) versions… but I just didn’t think either was the path to pursue. And then in the Spring of 2022 I decided that a summer project should be building a raised-bed garden on that location and taking advantage of the two structures 1) to allow climbing varieties of plants a wired structure to snake up, and 2) allow for the potential need to enclose the garden with chicken wire in case deer decided they might enjoy the produce resulting from the garden.
With this in mind, I drew out plans for the construction. I decided to make a raised bed of a particular height and width so that my sweetheart and I could tend the garden as our joints got stiffer in the years to come. After the plans were finalized (2 or 3 drafts occurred in the process), I ordered the cinder blocks to be delivered to my backyard rather than load and transport them myself. (I thought I would be doing enough hefting of blocks as I built this “edifice” ;-).
continued...
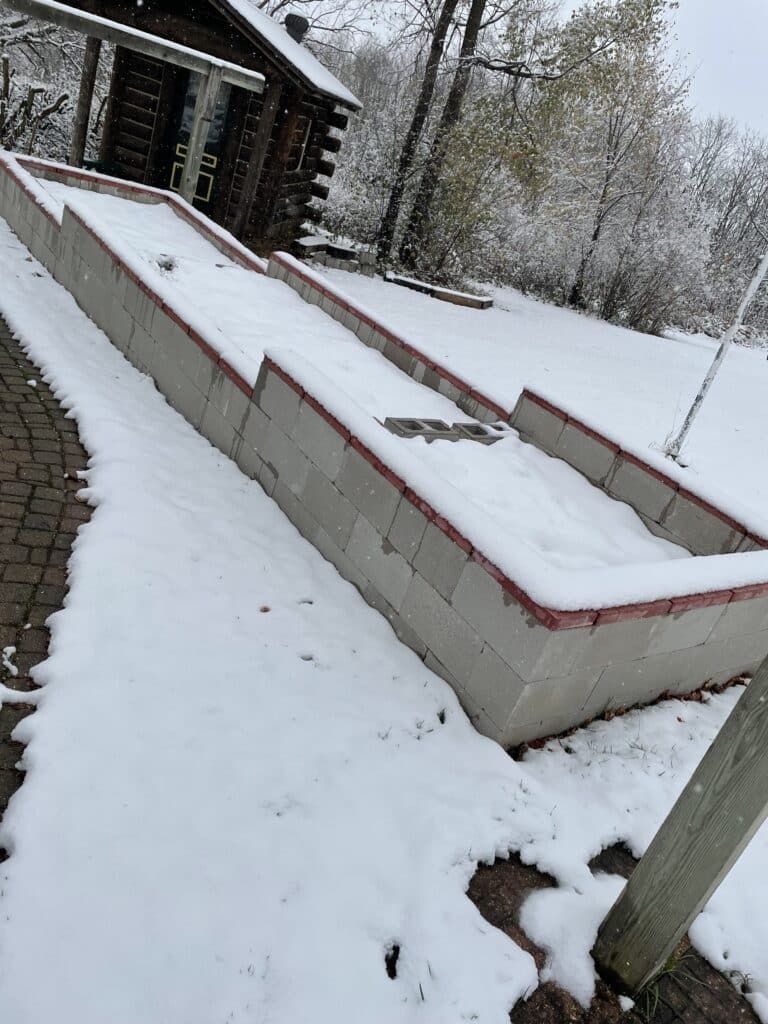
The ground where the garden spot was planned is not level; in fact, it has a decent pitch to it; so I decided to have the cinder blocks “terrace” according to the slope itself, but each individual block would all be level itself. I did not design the number of times the cinder blocks would “jump” to a new level, but would just let the natural slope determine when that would occur.
I marked off the perimeter of the garden to guide where the walls of cinder blocks would be and started digging an extremely shallow trench at the “bottom” of the garden. Once completed, I filled it somewhat with pea gravel to give a better foundation and to allow me to easily (OK, pretty easily) level each block as I built the wall.
Once the lowest part of the wall was positioned, I added the two upper levels of blocks in a staggered fashion as I moved along. After the short, east wall was in place (I completed this on part of a Saturday), I started along the long, north wall. This took more time due to 1) the length of the wall [over four times longer than the short wall], and 2) due to the rise in elevation as I proceeded. I did not have a plan on when to “jump” up to an additional block, but that became self-evident as I placed a block that ended with the end of it being slightly below the ground level. The next foundation block would be placed to be even with the 2nd-level blocks where the ground sloped away. This “transition” terracing with the slope occurred twice as I worked my way west in building the north wall.
I think this part of the building took parts of three different Saturdays; but once ½ of the wall was “built” a better sense of satisfaction was starting to take place. I did have summer activities (family and church that interrupted construction – I have a better understanding of when the contractor talks about a “delay in construction” ;-). I completed the short, west wall matching its counterpart on the east. Now, only the long, south wall awaited. I forgot to mention that a little prior to completing the north wall, my twine marking the perimeter of the garden was no longer guiding me. I think it was damaged by me (or maybe during mowing the lawn), but I thought all would be good.
Well, the best laid plans… I noted that as I was nearing completion of the south wall, my southeast “corner” would not be square–about 3” off. I manually “adjusted” the south wall to have a square corner. Fortunately, removing the blocks and adjusting the trench and pea gravel was not too much work as the trench did not need to be done over, just widened slightly and a little more as I moved to the SE corner and the blocks replaced.
Once I had four 90 degree corners, all was good as I was placing the blocks in a staggered fashion and not directly on top of the blocks below them. I did this for structural stability, beauty, and to allow the terracing transitions to be more secure. If you can picture this, all blocks had at least three levels in any part of the walls; thus, the transition at the jump for a terrace contained four blocks top to bottom for ½ of a block section of the wall.
Now that the production seemed finished and looked good, I took the top two layers of blocks apart (not all at once) and glued the blocks together with construction adhesive. Since the blocks were staggered and had a solid foundation, the wall should last and support the weight of an older person sitting on it while planting or weeding. I did vary from this manner of construction on the west wall (at the high end of the garden). I had decided that it would be nice to be able to have a tiller enter the garden without a lot of effort, so I did not glue the two top cinder blocks in the center of the short wall; with the slope of the ground, a piece of plywood would only have a slight incline for a tiller to enter the garden.
The look of the wall was satisfying… but something was missing. I decided to cap the walls with some flat, red-colored cinder blocks. Due to the west wall having two “removable” blocks, these two top blocks needed the pretty “red” cap glued to them and not “staggered” (i.e. not to parts of two blocks below them.) This departure for tiller access resulted in the caps on the west wall being aligned on top of each cinder block when being glued. The red caps on the north, south, and east walls were staggered to the blocks just below them (helping increase structural strength).
Well, what is a garden without dirt! Yes, I could try to move a bunch of dirt from somewhere else on the property… but, I thought that would be unwise. Earlier in the spring I had taken a load of clippings to our city’s clean fill (residents can drop off grass clippings, branches, shrubs, etc.) and saw a gentleman shoveling dirt into his truck…. Well, I went to inquire… and, to my joy, he said that topsoil was “free”. You just had to load it up yourself. Yes, the grass and clippings decay and create just what I wanted. Once the garden walls were complete, I spent 1 or so hours on quite a few Saturdays, shoveling topsoil into the back of my truck and then unloading it right into the garden. 🙂 Well, the clean fill is only open until the 2nd Saturday in November, so my topsoil filling only achieved 90% of the target. I will just finish the job in April right before we plant in our new, super-duper, raised bed garden. I think the veggies that we harvest will taste ever-so-slightly-better than usual given the sweat-equity in building a garden to last.